نحوه نصب SSD دوم ، یک هارد دیسک/SSD جدید را در ویندوز 10/8/7 نصب کنید – Easeus
راهنمای مبتدی – نصب یک هارد دیسک جدید/SSD در ویندوز 10/8/7
یک درگاه کابل داده SATA رایگان را روی مادربرد خود پیدا کنید و یک کابل داده SATA را نصب کنید.
نحوه نصب SSD دوم
جرمی لاوکونن نویسنده خودرو و فنی برای بسیاری از نشریات مهم تجارت است. هنگام تحقیق و آزمایش رایانه ، کنسول بازی یا تلفن های هوشمند ، او به روز در سیستم های پیچیده بی شمار که وسایل نقلیه الکتریکی باتری را برق می دهد ، به روز می ماند .
به روز شده در 11 آوریل 2022
- HDD & SSD
- راهنمای سریع وب کم
- صفحه کلید و موش
- مانیتور
- کارت
- چاپگر و اسکنر
- تمشک پی
چه چیزی باید بدانید
- قطعات و ابزارها را جمع کنید. کامپیوتر را از برق جدا کرده و پرونده را باز کنید. در یک خلیج درایو باز ، اگر یکی وجود داشته باشد ، کادوی را بردارید و SSD را وارد کنید.
- درایو کاددی را برگردانید یا درایو را در جای خود پیچ کنید. یک کابل داده SATA را به یک درگاه داده SATA در مادربرد وصل کنید.
- اتصالات داده SATA و SATA را به SSD وصل کنید. پرونده را ببندید و درایو را آغاز کنید.
در این مقاله نحوه نصب SSD دوم در رایانه شخصی ویندوز توضیح داده شده است. این قطعات لازم ، نصب فیزیکی و اولیه سازی درایو را با استفاده از مدیریت دیسک ویندوز پوشش می دهد. این اطلاعات مربوط به ویندوز 10 ، 8 است.1 ، 8 و 7.
آماده سازی برای نصب SSD دوم
نصب SSD دوم در رایانه ویندوز یک فرآیند دو مرحله ای است. ابتدا درایو را در داخل کامپیوتر نصب می کنید ، و سپس آن را با استفاده از ابزار مدیریت دیسک ویندوز برای سیستم عامل تنظیم می کنید تا آن را بشناسد و از آن استفاده کند.
اگر می خواهید SSD دوم را در رایانه شخصی خود نصب کنید ، آنچه شما نیاز دارید در اینجا آورده شده است:
- یک خلیج درایو باز در رایانه
- اتصال داده SATA باز در مادربرد
- یک درایو SSD
- پیچ گوشتی برای باز کردن پرونده و ایمن کردن درایو در محل
- یک کابل داده SATA
- یک اتصال دهنده برق SATA موجود
- آداپتور اگر SSD در یک خلیج برای 5 نصب شود.درایو 25 اینچی
از این موارد ، مهمترین آنها یک خلیج درایو باز و اتصال داده باز SATA در مادربرد شما است. بیشتر موارد رایانه ای با تعدادی از خلیج های باز همراه است و بیشتر مادربردها دارای تعدادی اتصالات SATA برای SSD ها و لوازم جانبی مانند درایوهای Blu-ray هستند ، اما باید بررسی کنید که قبل از سرمایه گذاری در SSD جدید ، فضای دارید.
لپ تاپ ها یک استثنا هستند ، زیرا بیشتر لپ تاپ ها فضایی برای نصب SSD دوم ندارند. اگر لپ تاپ شما فضا دارد ، پس به اتصال SATA احتیاج ندارید. خلیج های درایو لپ تاپ با اتصالات برق و داده های داخلی همراه هستند.
اگر مادربرد شما هیچ پورت SATA در دسترس ندارد ، می توانید یک کنترلر SATA خریداری کنید که به یک شکاف PCI یا PCIE وصل شود. به همین ترتیب ، اگر خارج از اتصالات SATA هستید ، می توانید از آداپتور Molex یا شکاف کابل برق SATA استفاده کنید.
نحوه نصب SSD دوم در رایانه ویندوز خود
پرونده ها با گذشت زمان جمع می شوند. در نهایت ، شما با حذف پرونده های قدیمی یا استفاده از یک دستگاه ذخیره سازی ثانویه روبرو خواهید شد. ساده ترین راه برای افزودن ذخیره سازی به رایانه شخصی خود وصل کردن یک درایو خارجی به رایانه شخصی و انجام آن است. با این حال ، اگر مورد رایانه شما اتاق دارد و تمام اجزای و ابزارهای لازم را در اختیار دارید ، می توانید SSD دوم را نصب کنید.
مراقب باشید در حین کار در مورد رایانه شخصی خود از تخلیه استاتیک خودداری کنید. اگر یکی از آنها را دارید ، از بند مچ دست ضد استاتیک استفاده کنید ، یا اگر این کار را نکنید ، خود را به روش دیگری زمین بزنید.
- رایانه شخصی خود را از برق جدا کرده و پرونده را باز کنید.
:max_bytes(150000):strip_icc()/1a-91c37fe06a894ea0a15911e905c1892e.jpg)
یک خلیج درایو باز را پیدا کنید.
پرونده شما ممکن است علاوه بر خلیج های محیطی یک یا دو اندازه خلیج درایو مختلف داشته باشد. اگر 2 نفر ندارید.5 اینچ خلیج درایو موجود است ، 2 خریداری کنید.5 تا 5.آداپتور 25 اینچی برای SSD خود و از 5 استفاده کنید.خلیج 25 اینچی.
:max_bytes(150000):strip_icc()/2-592fd3f7840a4920ad76f094d83c28e2.jpg)
درایو Caddy را برداشته و SSD جدید خود را در آن نصب کنید.
بعضی موارد دارای کادوی رانندگی نیستند. ممکن است شما نیاز داشته باشید که درایو خود را مستقیماً به داخل خلیج بکشید و آن را در جای خود پیچ کنید ، یا ممکن است اتصال دهنده های داخلی وجود داشته باشد که شما پیچ خورده یا تلنگر می زنید. اگر نمی توانید آن را بفهمید با دفترچه راهنما که با پرونده شما همراه است مشورت کنید.
:max_bytes(150000):strip_icc()/3-4c5a4446f16443d0a6e9213779544f51.jpg)
کادوی را دوباره به داخل خلیج درایو نصب کنید.
بسته به مورد شما ، کادوی ممکن است به طور خودکار به جای خود بمیرد ، یا ممکن است شما مجبور به استفاده از بستر به نوعی باشد.
:max_bytes(150000):strip_icc()/5-3047075171974a178b23325a74092d68.jpg)
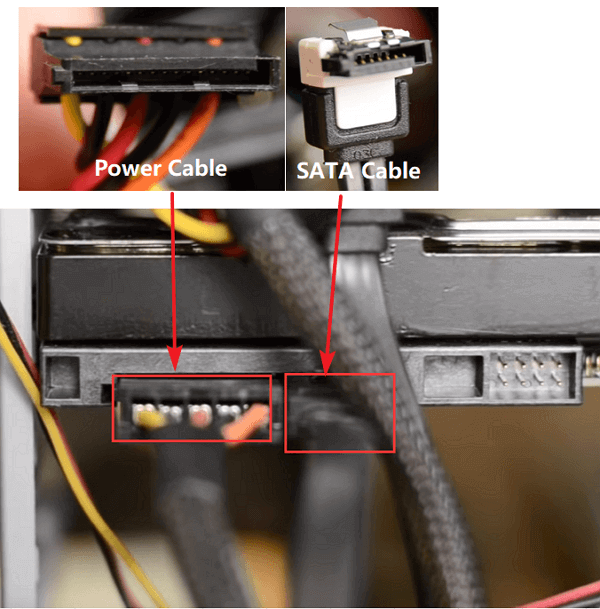
یک درگاه کابل داده SATA رایگان را روی مادربرد خود پیدا کنید و یک کابل داده SATA را نصب کنید.
:max_bytes(150000):strip_icc()/4-9b54d2e2b1aa466f8ecb4c97ee01f975.jpg)
یک اتصال دهنده قدرت SATA رایگان پیدا کنید.
.
:max_bytes(150000):strip_icc()/6-0094128015f74a7c84f1011743f4d556.jpg)
اتصالات SATA Power و Data را به درایو SSD خود وصل کنید.
اتصال برق طولانی تر از دو اتصال دهنده در SSD شماست. به جهت گیری اتصالات L شکل توجه داشته باشید و مراقب باشید که اتصالات را در جهت صحیح نصب کنید.
نحوه اولیه سازی SSD جدید در ویندوز
هنگامی که SSD دوم خود را با موفقیت نصب کردید و همه چیز را به آن وصل کرده اید ، وقت آن است که رایانه شخصی خود را روشن کنید و مطمئن شوید که همه چیز کار می کند. اگر ویندوز هیچ یک از درایوها یا لوازم جانبی شما را تشخیص نمی دهد ، از سیم های گشاد یا جدا نشده استفاده کنید. اگر همه چیز در حال کار است ، می توانید پیش بروید و SSD جدید خود را تنظیم کنید.
به طور پیش فرض ، ویندوز SSD دوم شما را می بیند و تشخیص می دهد ، اما قادر به استفاده از آن برای هر چیزی نخواهد بود. قبل از اینکه واقعاً از آن استفاده کنید ، باید اولیه را برای استفاده با ویندوز اولیه کنید و سپس آن را قالب بندی کنید. پس از اتمام این فرآیند ، SSD جدید شما برای ذخیره پرونده های جدید و انتقال پرونده های قدیمی از درایو اصلی خود برای آزاد کردن فضا در دسترس خواهد بود.
در اینجا نحوه تنظیم SSD تازه نصب شده در ویندوز آورده شده است:
- هدایت به صفحه کنترل >مدیریت دیسک.
در ویندوز 7 ، روی کلیک کنید دکمه شروع, کلیک راست کامپیوتر, و انتخاب کنید مدیریت کردن برای دسترسی به مدیریت دیسک.
:max_bytes(150000):strip_icc()/B2-InstallaSecondSSD-annotated-a0956a966295464a878c5ce85ad015ce.jpg)
اگر از ابتدای دیسک خواسته شد ، انتخاب کنید GPT (جدول پارتیشن GUID) و کلیک کنید خوب.
اگر از ویندوز 7 استفاده می کنید ، انتخاب کنید MBR (رکورد بوت مستر).
:max_bytes(150000):strip_icc()/B3-InstallaSecondSSD-annotated-3f04cb6edeb8417990d4d0e2183ff4b9.jpg)
اگر جادوگر راه اندازی به طور خودکار شروع می شود ، به مرحله 5 بروید. در غیر این صورت ، پنجره مدیریت دیسک را پیمایش کنید تا SSD جدید خود را پیدا کنید.
شما به راحتی می توانید SSD جدید خود را شناسایی کنید زیرا این تنها موردی خواهد بود غیر قابل انتقال.
:max_bytes(150000):strip_icc()/B4-InstallaSecondSSD-annotated-b1f1779f0dae47ee87cedfafd1983e6a.jpg)
کلیک راست ، و انتخاب کنید حجم ساده جدید.
:max_bytes(150000):strip_icc()/B5-InstallaSecondSSD-annotated-06111a63c8434f99ac341c15b5378dcc.jpg)
کلیک بعد.
:max_bytes(150000):strip_icc()/B6-InstallaSecondSSD-annotated-489e0aae82724c5194a5cf12bfa73b1e.jpg)
اطمینان حاصل کنید که دو عدد مطابقت دارند و کلیک کنید بعد.
اگر می خواهید چندین پارتیشن در این درایو ایجاد کنید ، به جای تطبیق اعداد ، اندازه پارتیشن مورد نظر را وارد کنید.
:max_bytes(150000):strip_icc()/B7-InstallaSecondSSD-annotated-41e4306f238743229bcf20150c7a0a01.jpg)
اگر یک مورد پیش فرض را دوست ندارید ، یک نامه درایو را انتخاب کنید و کلیک کنید بعد.
:max_bytes(150000):strip_icc()/B8-InstallaSecondSSD-annotated-f1a04799b5874742a9903f99ef61886b.jpg)
از سیستم فایل NTFS استفاده کنید مگر اینکه دلیلی برای انجام غیرقانونی داشته باشید ، اندازه واحد تخصیص را همانطور که هست بگذارید ، در صورت تمایل یک برچسب حجم وارد کنید و کلیک کنید و کلیک کنید بعد.
:max_bytes(150000):strip_icc()/B9-InstallaSecondSSD-annotated-c431a3294b454402b4a34c5dbb5d4903.jpg)
اطلاعات را تأیید کنید و کلیک کنید پایان.
:max_bytes(150000):strip_icc()/10-68cc8ffea546486a960d1619d6b98b9b.PNG)
SSD دوم شما اکنون آماده استفاده است.
SSD برای چه چیزی ایستاده است?
SSD مخفف یک درایو حالت جامد است ، یک سیستم ذخیره سازی که از یک تراشه برای ذخیره داده ها استفاده می کند. .
تفاوت بین SSD و HDD چیست?
تفاوت اصلی بین SSD و HDD در این است که هارد دیسک ها داده ها را روی دیسک فیزیکی ذخیره می کنند در حالی که درایوهای حالت جامد داده ها را در تراشه ها ذخیره می کنند. HDD ها نیز ارزان تر و بزرگتر از SSD های کوچکتر و کارآمد هستند.
چگونه می توانم هارد دیسک خود را به SSD کلون کنم?
برای کلون کردن HDD به SSD ، از Macrium بازتاب 7 استفاده کنید. درایو را به کلون انتخاب کنید و به آن بروید کلون این دیسک > مقصد > دیسک را به کلون انتخاب کنید.
آیا می توانم SSD را روی PS5 خود نصب کنم؟?
آره. سونی در صورت تمایل به گسترش ذخیره سازی آن ، دستورالعمل هایی برای اضافه کردن SSD دوم به PS5 خود دارد.
راهنمای مبتدی – یک هارد دیسک/SSD جدید را در ویندوز 10/8/7 نصب کنید
این صفحه آموزش شامل پیشنهادات کاملی در مورد نحوه نصب هارد دیسک جدید یا SSD در رایانه شخصی ویندوز یا لپ تاپ شما است. اگر قصد دارید درایو جدیدی را به رایانه خود اضافه کنید یا اضافه کنید ، این مقاله را دنبال کنید تا دیسک جدید در ویندوز 10/8/7 کار کند.
ویندوز 11/10/8/7 100 ٪ ایمن
![]()
![]()
به روز شده توسط دیزی در 2023/07/20
![]()
![]()
نوشته شده توسط تریسی کینگ
- 01 HDD در مقابل SSD ، تفاوت چیست
- 02 نحوه نصب هارد جدید
- 04 نحوه پارتیشن هارد دیسک های HDD در ویندوز
- 05 نحوه تقسیم یک هارد در ویندوز 11/10
- 06 نحوه به روزرسانی دیسک ویندوز
- 07 نحوه قالب گیری HDD به صورت رایگان
- 08 کلون بزرگتر HDD به SSD کوچکتر
- 09 HDD آهسته: نحوه سرعت بخشیدن به HDD
- 10 خطاهای پارتیشن دیسک سخت را بررسی و تعمیر کنید
- 11 هارد دیسک نمی چرخد
- با کلیک بر روی HDD (هارد دیسک)
- 13 جایگزین بازسازی کننده HDD
برای کامپیوتر. مراحل کامل
برای لپ تاپ. مراحل کامل
مرحله 1. دیسک را به MBR یا GPT اولیه کنید. گام 2. از هارد دیسک جدید استفاده کنید. مراحل کامل
در ادامه ، یک راهنمای کامل در مورد نحوه نصب و تنظیم یک هارد دیسک جدید یا SSD در ویندوز 10/8/7 را یاد خواهید گرفت. .
قسمت 1. درایو جدید را روی رایانه شخصی یا لپ تاپ نصب کنید
پس از گرفتن هارد دیسک جدید یا خانه جدید SSD ، باید آن را در رایانه شخصی یا لپ تاپ خود نصب کنید. برای نصب درایو جدید می توانید با این قسمت پیگیری کنید. در اینجا ما ابزارهای مورد نیاز و تمام مراحل دقیق را به شما خواهیم گفت.
ابزارهایی که لازم دارید
در اینجا یک لیست آماده سازی از ابزارهایی که برای نصب دیسک جدید روی رایانه شخصی یا لپ تاپ خود نیاز دارید وجود دارد:
- یک پیچ گوشتی
- درایو جدید – یک هارد دیسک معمولی یا SSD
- کابل اتصال SATA
مراحل نصب درایو جدید
همانطور که می دانید به دلیل طراحی های مختلف دسک تاپ و لپ تاپ ، راه های نصب هارد دیسک جدید نیز تا حدی متفاوت است. مراحل دقیق را دنبال کنید و دیسک جدید را روی رایانه خود نصب کنید.
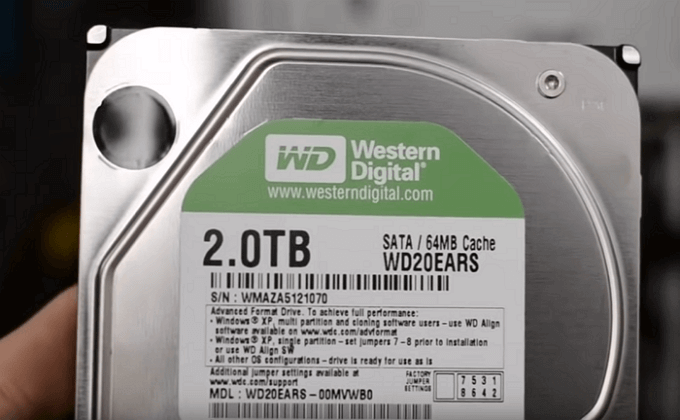
در اینجا ، ما یک هارد 2TB را به عنوان نمونه می گیریم تا روند کامل نصب آن را در رایانه رومیزی به شما نشان دهیم.
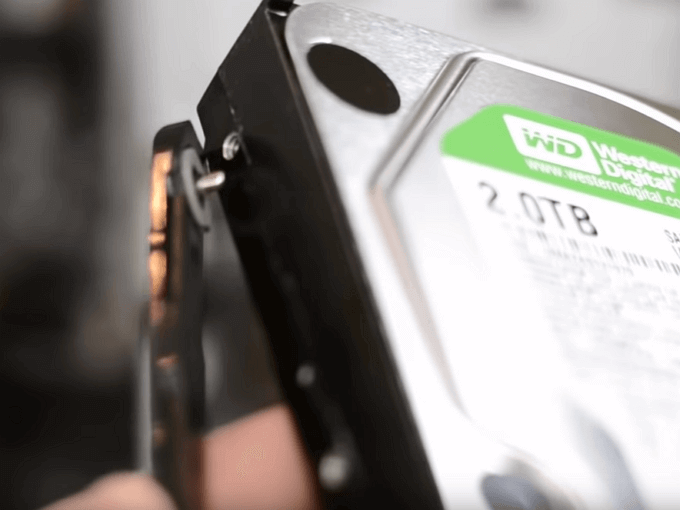
مرحله 1. رایانه خود را خاموش کرده و درایو جدید را از کیس یا جعبه درایو خارج کنید.
گام 2. درایو جدید را آماده کنید.
اگر این یک هارد دیسک جدید است ، پیچ های هر دو طرف این دیسک را بردارید.
و خلیج های درایو را به داخل سوراخ های پیچ در هر دو طرف درایو جدید بکشید.
اگر SSD است ، باید یک شکاف ویژه نصب یا یک آداپتور درایو اضافه کنید تا در 3 قرار بگیرد.5 شکاف با پیچ هایی مانند این:
مرحله 3. پرونده رایانه رومیزی را حذف کنید.
اگر توسط پیچ ها قفل شده است ، آنها را با پیچ گوشتی خود بردارید.
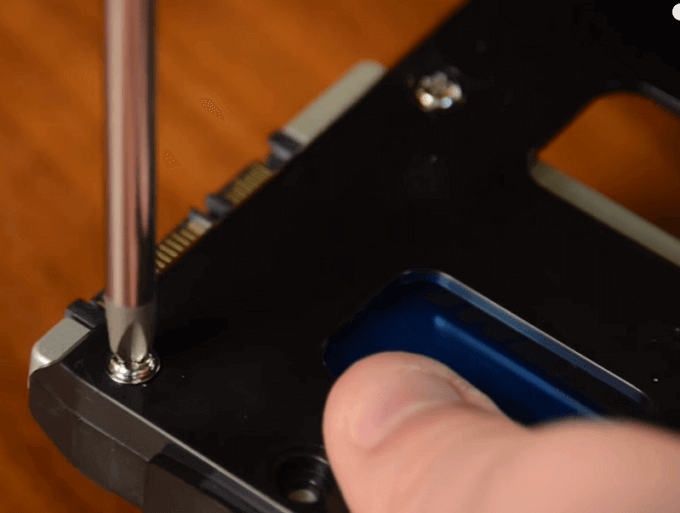
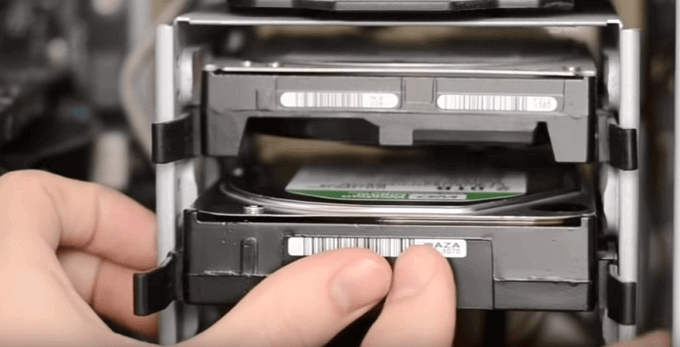
مرحله 4. درایو جدید خود را در مورد رایانه کنار درایو قدیمی خود بکشید.
مرحله 5. درایو جدید را با کابل SATA به مادربرد رایانه خود وصل کنید و یک کابل برق را وصل کنید تا روی درایو برق بگیرید.
مرحله 6. پرونده رایانه خود را ببندید و دوباره راه اندازی کنید.
برای لپ تاپ:
امروزه برخی از لپ تاپ های جدید با اضافه کردن دو یا چند هارد دیسک پشتیبانی می کنند. در حالی که بیشتر لپ تاپ های قدیمی یا برخی از لپ تاپ های باریک جدید فقط یک خلیج هارد دارند.
اگر لپ تاپ شما یک خلیج هارد دیسک دیگر دارد ، ممکن است به راحتی درایو جدید را وارد کرده و آن را برای شما کار کند.
اگر لپ تاپ شما فقط یک خلیج هارد دیسک دارد ، ممکن است دو گزینه برای نصب هارد دیسک جدید یا درایو SSD داشته باشید.
انتخاب 1. با تعویض DVD یا Blu-ray درایو ، HDD/SSD 2 را به لپ تاپ اضافه کنید
در اینجا ، ما یک آموزش ویدیویی مفصل و مفید پیدا کردیم که می تواند با تعویض DVD یا Blu-ray درایو ، هارد دوم یا SSD را به لپ تاپ اضافه کنید.
گزینه 2. درایو قدیمی را با درایو جدید روی لپ تاپ جایگزین کنید
این ویدئو روند جایگزینی یک هارد لپ تاپ قدیمی را با SSD نشان می دهد:
در مورد ابزار Clone System ذکر شده ، ممکن است این لینک را برای بارگیری نسخه پشتیبان تهیه Easeus Todo برای کمک دنبال کنید.
قسمت 2. درایو جدید را در ویندوز 10/8/7 تنظیم کنید
پس از نصب درایو جدید روی لپ تاپ خود ، اکنون می توانید به قسمت بعدی بروید تا هارد دیسک خود را تنظیم کنید و باعث می شود آن را برای شما کار کند.
برای صرفه جویی در وقت و انرژی خود ، ما می خواهیم یک نرم افزار قابل اعتماد پارتیشن مدیر را توصیه کنیم – Easeus Partition Master برای کمک به شما در ابتدای کارآیی دیسک و پارتیشن هارد با سهولت کمک می کند.
ویژگی های اصلی استاد پارتیشن سهولت:
- پارتیشن های رایانه خود را با کلیک ساده مدیریت کنید.
- برای سرعت بخشیدن به ویندوز ، سیستم عامل را به SSD مهاجرت کنید.
- به شما امکان حذف و همچنین ایجاد پارتیشن را می دهد.
- هوشمند اندازه درایو خود را تنظیم کنید. درایو C را با یک کلیک بزرگ کنید.
استاد پارتیشن Easeus را اکنون بارگیری کنید و برای مدیریت درایو جدید خود ، راهنمای زیر را دنبال کنید.
ویندوز 11/10/8/7 100 ٪ ایمن
دو مرحله بعدی را طی کنید تا درایو جدید برای شما کار کند:
شماره 1. دیسک را به MBR یا GPT اولیه کنید
فرض کنید که درایو جدید نصب شده اکنون روی رایانه یا لپ تاپ شما منتقل نشده است ، ابتدا باید آن را اولیه کنید.
اطلاع: اگر قصد دارید از دیسک جدید برای جایگزینی دیسک سیستم استفاده کنید ، باید آن را به همان سبک پارتیشن مانند دیسک سیستم خود اولیه کنید.
Easeus Partition Master به شما کمک می کند تا هارد جدید خود را فقط در 3 مرحله قابل خواندن کنید:
مرحله 1. استاد پارتیشن سهولت باز و به مدیر پارتیشن رسید.
گام 2. بر روی دیسک هدف – HDD یا SSD راست کلیک کرده و “Initialize to MBR” یا “Initialize to GPT” را انتخاب کنید. برای ذخیره تغییرات ، “اجرای کار” و “اعمال” را کلیک کنید.
0: 00-0: 18 اولیه به MBR ؛ 0: 19-0: 44 اولیه به GPT ؛
. از هارد دیسک جدید استفاده کنید
اگر قصد دارید دیسک سیستم خود را به درایو جدید ارتقا دهید ، ویژگی OS MINGRATE OSEASS PARTITION MASTER انتخاب خوبی است. این ویدیو به شما می گوید چگونه این کار را انجام دهید:
اگر قصد دارید هارد دوم را به عنوان دیسک داده بسازید ، می توانید ویژگی هارد پارتیشن را در این نرم افزار اعمال کنید تا پارتیشن های جدیدی با سهولت ایجاد کنید:
مرحله 1. راه اندازی استاد پارتیشن Easeus. در پنجره اصلی ، بر روی فضای غیرمجاز روی هارد دیسک یا دستگاه ذخیره سازی خارجی خود راست کلیک کرده و “ایجاد” را انتخاب کنید.
گام 2. اندازه پارتیشن ، سیستم فایل را تنظیم کنید (سیستم فایل را بر اساس نیاز خود انتخاب کنید) ، برچسب و غیره. برای پارتیشن جدید و برای ادامه روی “OK” کلیک کنید.
مرحله 3. بر روی دکمه “Execute 1 Task (S)” کلیک کنید و با کلیک روی “اعمال” یک پارتیشن جدید ایجاد کنید.
آموزش ویدیویی زیر را تماشا کنید و یاد بگیرید که چگونه یک پارتیشن در سیستم NTFS ، FAT یا EXT FILE ایجاد کنید.
آماده سازی. هارد دیسک جدید خود را انتخاب کنید
اگر یک خانه هارد دیسک جدید خریداری کرده اید ، می توانید مستقیماً از این قسمت پرش کنید و راهنمای نصب هارد دیسک جدید یا SSD را دنبال کنید.
اگر هنوز درایو مناسب را انتخاب نکرده اید ، در اینجا برخی از عوامل مهم وجود دارد که ممکن است به شما کمک کند تصمیم بگیرید که کدام درایو را می خواهید روی رایانه خود نصب کنید و نصب کنید – یک هارد دیسک معمولی یا دیسک SSD.
1. قیمت
اگر قصد ندارید پول زیادی برای خرید دیسک جدید ارائه دهید ، یک هارد دیسک معمولی بهترین عکس شما خواهد بود. در مقایسه با یک هارد دیسک معمولی ، ما می دانیم که اگرچه اخیراً قیمت دیسک SSD در واقع پایین می آید ، اما یک دیسک حالت جامد هنوز هم افراد عادی را کاملاً یک دسته از دلار شارژ می کند.
2. هدف شما
یکی دیگر از عوامل مهم که ممکن است بر تصمیم شما تأثیر بگذارد ، روشن کردن هدف شما از نصب یک درایو جدید – مهاجرت سیستم عامل یا افزایش ظرفیت ذخیره سازی است.
اگر عملکرد سیستم رایانه ای شما تخریب می شود ، هارد دیسک سیستم شما قدیمی است ، شما نیاز به به روزرسانی دیسک سیستم دارید. انتخاب عاقلانه شما این است که یک دیسک SSD جدید بدست آورید.
اگر هارد دیسک رایانه شما برای صرفه جویی در داده ها از فضا خارج است ، باید یک هارد دوم را به عنوان یک درایو داده به رایانه خود اضافه کنید. در این حالت ، تمام آنچه شما نیاز دارید یک هارد دیسک معمولی با ظرفیت ذخیره سازی کافی است.
3. رابط SATA
معمولاً تعداد رابط های SATA در مادربرد رایانه شما تصمیم می گیرد که چه تعداد هارد دیسک را می توانید به رایانه خود اضافه کنید.
اگر رایانه یا لپ تاپ شما فقط یک جفت رابط SATA دارد ، ما بسیار متاسفیم که فقط می توانید فقط یک دیسک نصب کنید. این بدان معناست که برای نصب روی رایانه خود نیاز به خرید یک درایو جدید و بزرگتر دارید:
- با پول کمتری با فضای بزرگتر ، یک هارد دیسک معمولی بهترین انتخاب شماست.
- برای سرعت سریعتر با فضای بزرگتر ، SSD برای شما مناسب است.
برای اطلاعات بیشتر بین SSD و HDD ممکن است به این لینک مراجعه کنید: HDD در مقابل SSD.
سؤالات متداول در مورد نصب هارد دیسک جدید
برخی از شما هنوز هم ممکن است در مورد نصب هارد دیسک جدید به دسک تاپ یا لپ تاپ خود سؤال کنید. در اینجا ما 5 سؤال مربوطه را جمع کردیم و یک پاسخ کوتاه برای کمک به شما ذکر کردیم.
1. چگونه می توانم یک هارد جدید تنظیم کنم?
ابتدا از مدیریت دیسک یا استاد پارتیشن Easeus استفاده کنید همانطور که در قسمت 2 در این صفحه نشان داده شده است تا هارد دیسک جدید را آغاز کنید.
.
برای به روزرسانی دیسک سیستم ، ممکن است OS Migrate به SSD را به عنوان راهنما دنبال کنید.
2. چگونه می توانم یک هارد دیسک جدید را در ویندوز 10 نصب کنم?
این روند مشابه روند ارائه شده در این صفحه است:
- هارد دیسک جدید ، پیچ گوشتی ، کابل SATA> را خاموش کنید
- کیس رایانه یا لپ تاپ را حذف کنید> هارد دیسک جدید را وارد کنید
- راه اندازی مجدد PC و اولیه سازی هارد دیسک> پارتیشن هارد دیسک یا مهاجرت سیستم عامل با استاد پارتیشن Easeus.
برای یک راهنمای دقیق ، پیگیری دستورالعمل های ارائه شده در این صفحه.
3. چگونه یک هارد دیسک جدید را قالب بندی کنیم?
وقتی برای اولین بار یک هارد جدید نصب می کنید ، اگر اولیه نشده باشد ، ممکن است رایانه نتواند آن را تشخیص دهد.
بنابراین اولین کار شما باز کردن مدیریت دیسک ، پیدا کردن و کلیک راست بر روی هارد دیسک جدید است ، برای اولیه سازی آن را انتخاب کنید. سپس می توانید با کلیک راست بر روی فضای غیرمجاز ، پارتیشن هایی را روی آن ایجاد کنید و برای ایجاد حجم ساده جدید انتخاب کنید.
پس از این ، می توانید هارد جدید را با کلیک راست با کلیک راست قالب بندی کنید تا پارتیشن های ایجاد شده را قالب بندی کنید.
4. بعد از نصب هارد دیسک جدید چه باید کرد?
بعد از نصب هارد دیسک جدید ، می توانید ابتدا آن را در استفاده از نرم افزار Management Disk Management یا Partition Manager مانند Easeus Partition Master توصیه کنید که در اینجا توصیه می شود.
سپس باید هدف خود را از نصب این درایو دوباره فکر کنید.
- برای گسترش ظرفیت ذخیره سازی ، می توانید پارتیشن های جدیدی را در درایو ایجاد کرده و داده های خود را به دیسک جدید منتقل کنید.
- برای به روزرسانی دیسک سیستم ، شما باید با استفاده از استاد پارتیشن Easeus یا سایر ابزارهای مهاجرت سیستم ، سیستم را به دیسک جدید منتقل کنید.
5. نحوه استفاده از هارد قدیمی به عنوان درایو داده دوم?
- ابتدا باید یک هارد دیسک جدید را روی رایانه یا لپ تاپ خود نصب کنید. برای یک راهنمای دقیق ، مراحل قسمت 1 در این صفحه را دنبال کنید.
- در مرحله بعد ، با دنبال کردن فیلم مهاجرت سیستم در این صفحه در قسمت 2 ، سیستم را به هارد دیسک جدید مهاجرت کنید.
- آخر ، با تغییر دنباله بوت BIOS ، رایانه را از هارد دیسک جدید راه اندازی مجدد کنید و سپس از مدیریت دیسک یا استاد پارتیشن Easeus برای حذف درایو سیستم قدیمی استفاده کنید و پارتیشن های جدیدی را در درایو قدیمی ایجاد کنید تا داده ها را ذخیره کنید.